PM3 | Page 2 | Concept2

PM3

Understanding How Heart Rate Data is Stored

When using a compatible heart rate chest belt, the PM3, PM4 and PM5 store heart rate data as follows:

  • Splits: The PM stores the last good heart rate at the end of a split.
  • Interval work period: The PM stores the last good heart rate at the end of the interval.
  • Rest when doing a variable interval workout: The PM stores the ending heart rate.
  • Rest when doing a time or distance interval workout: The ending heart rate is not stored.

Viewing a Verification Code

Verification codes are used primarily for Concept2 world and national records. They are not needed or required to participate in the Concept2 Online Logbook, Rankings, or challenges.

The PM3, PM4 and PM5 monitors generate a verification code for each piece. This is a 16-digit code that is based on workout date, distance and duration. If you are entering a piece for the Online Rankings, you may want to edit your online logbook entry using the pencil icon and enter this code. Doing so will mark your piece as verified in the Ranking. Note: there is no need to enter a verification code if you are uploading your results using the Concept2 Utility or ErgData app, as these pieces are considered verified automatically.

To get the verification code for a piece:

  1. Ensure your PM is running the latest firmware.
  2. Ensure the date and time on your PM is accurate.
  3. Take care when setting up your workout, and complete your piece.
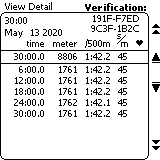
  4. After you have completed your piece, select (View Detail) for the piece.
    • If you are using a LogCard or USB flash drive, go to LogCard Menu or USB Logbook > List By Date and select the magnifying glass icon for the workout you want to view.
    • If you are not using a LogCard, go to Main Menu > More Options > Memory and select the magnifying glass icon for the workout you want to view.
  5. On the View Detail screen, for PM5s running the latest firmware the fourth gray button on the right has a V symbol in a circle. Press this button once. On PM5s running older firmware, or on PM3s and PM4s, the fourth gray button on the right has no action associated with it. Press this button twice. The 16-digit verification code will be displayed in the upper right hand corner of the monitor.

If you have any questions or difficulties, please email ranking@concept2.com.

Error Codes

Error Code Description Resolution
37-, 39-, 137- or 240- These error codes are associated with the LogCard or the PM Memory if no LogCard is used. Resolution
43 This error code indicates there is a problem with the LogCard format. Resolution
50 This error occurs when the monitor cannot properly compute the drag factor. Resolution
120- through 129- These error codes occur when the monitor is being used with external or third-party software. Resolution
573-1 This error occurs when powering up the performance monitor. Resolution

Resolution for Error Code 573-1

Concept2 recommends updating the firmware in the monitor to the latest version. In the meantime, use one of the following resolutions to fix the problem.

  • If you have not yet installed batteries in your performance monitor, do so now to resolve the problem.
  • If your monitor already has batteries in it, you can resolve the issue by removing the batteries and unplugging the USB cable and leaving the batteries and cable out for 24 hours.
  • If you need to get your monitor functioning quickly, instead of the 24 hour reset, you can perform the following factory reset. Just be aware that although performing the following reset will resolve the problem, it will also clear all memory (including lifetime meters) as well as any language, date, and time settings:
    • On the face of the monitor, press and hold the Change Units and Change Display buttons, while pressing and releasing the Reset button on the back of the monitor.

Resolution for Error Code 50

Several situations can cause an error code 50:

  • Plastic wrap around the flywheel.
  • Very fast, arms-only rowing, especially with some older versions of Performance Monitor firmware.
  • A dirty flywheel enclosure.
  • An incorrectly programmed Performance Monitor.

If you are getting an error code 50, here are some steps to take:

  1. If this is a new machine, ensure that the plastic wrap has been removed from the flywheel.
  2. Make sure your PM is running current firmware. See PM3, PM4 or PM5 for more information.
  3. Check the flywheel enclosure and clean out any debris. Refer to the following instructions:
  4. For monitors on indoor rowers, ensure that your monitor is correctly programmed for the indoor rower model on which it’s installed: From the Main Menu select More Options > Utilities > Product ID. Look at what appears next to "Model." This should be D or D/E for Model Ds, and D/E for Model E and Dynamic Indoor Rowers. (For reference, D/E will also be listed for SkiErgs, but this procedure applies to indoor rowers only.) If you have retrofitted a monitor to an older indoor rower, this should read C, B or A according to the indoor rower you have. If this doesn't match the indoor rower model you have, take the following steps:
    1. From the Main Menu, select More Options > Utilities > LCD Contrast.
    2. Press Change Units or Units three times.
    3. Press Change Display or Display three times.
    4. When the Set Rower Type screen appears, press the button next to Change Type until the correct indoor model is displayed:
      • D or D/E for Model D Indoor Rowers
      • D/E for Model E and Dynamic Indoor Rowers
      • C, B or A as appropriate for the indoor rower you have, if you've retrofitted a monitor to an older machine
    5. Select Set Type to save the setting.

    Note: If you change the monitor batteries, you may need to follow this procedure again.

If the problem persists after performing these steps, contact Concept2 for assistance.

Resolution for Error Code 43

Resolution 1: Check LogCard and Machine

Check that you are not trying to use a SkiErg LogCard with an indoor rower or vice versa. Each type of LogCard is formatted specifically for its intended machine (SkiErg or indoor rower). Look at the front of the LogCard to determine what kind of card it is.

Resolution 2: Repair LogCard

Your LogCard's information may be damaged and need repair. You can do this using the Concept2 Utility.

  1. Download and install the latest version of the Concept2 Utility on your computer.
  2. Launch the Concept2 Utility.
  3. Connect the PM to your computer with the USB cable provided with your PM.
  4. Insert your LogCard into the PM.
  5. Using the Concept2 Utility, transfer your LogCard data to a spreadsheet. During the transfer data function, the Concept2 Utility will detect and correct the errors associated with the LogCard. It does this by rewriting the card. When you are prompted to have the Concept2 Utility rewrite the card, select OK. Your data will be retained.

Resolution for Error Codes 37-, 39-, 137-, and 240-

Resolution 1: If LogCard is Used

  1. Download and install the latest version of the Concept2 Utility on your computer.
  2. Launch the Concept2 Utility.
  3. Connect the PM3 or PM4 to your computer with the USB cable provided with your monitor.
  4. Insert your LogCard into the monitor.
  5. Using the Concept2 Utility, transfer your LogCard data to a spreadsheet. During the transfer data function, the Concept2 Utility will detect and correct the errors associated with the LogCard, which it does by rewriting the card. When you are prompted to have the Concept2 Utility rewrite the card, select OK. Your data will be retained.

Resolution 2: If No LogCard is Used

  1. Perform a full monitor reset.
    Warning: Depending on the age of your monitor, resetting the monitor may delete all workout data from the monitor memory; workout data stored on a LogCard will not be deleted. Additionally, following a reset, you may need to re-program your monitor with the correct language, and the current date and time.
    To perform a full monitor reset:

    1. Remove both D cell batteries or the battery pack from the monitor.
    2. Leave the batteries/battery pack out of the monitor overnight.
    3. Hold down the UNITS and DISPLAY buttons. While holding these down, re-install the battery pack. If you are using batteries, install two fresh D cell batteries.
  2. Update the PM3 or PM4 firmware.

Racing with PM3s or with a Mix of PM3s, PM4s and PM5s

If you have PM3s, your option for running a race is to run a wired race with a PC and using USB cables as the means of wiring (network/Ethernet cables will not work). This is also your option if you have a mix of PM3s, PM4s and PM5s.

Wired racing with a PC requires the use of a software package to manage the race. The two options for software packages are:

  • Concept2’s Venue Race Application

    The Venue Race Application is available as a free download from the Service section of our website. You will also find supporting documentation, such as Race Guides, indoor rower configuration, wiring diagrams, known issues, and 3rd party solutions you can use in conjunction with the Venue Race Application.

  • Digital Rowing’s RowPro

    RowPro enables venue racing with up to 16 boats per race in 3D on your PC. Boats can be single sculls, doubles, quads or octuples. RowPro also enables Online Rowing and Racing with one single scull per PC. For more information about racing with RowPro, visit digitalrowing.com.

Battery Information

PM3s and PM5s use two D cell batteries.

Checking the Battery Level

  1. On the Main Menu, select More Options.
  2. Select Utilities.
  3. Select Battery. The amount of power left will be displayed as a percentage.

Pages