The PM allows you to program several types of workouts…or none at all if that’s your preference. Read on to learn the basics.
Just Row/Ski
If you’re not the button-pushing type, just hop on an indoor rower or SkiErg and start pulling; the monitor will power up and begin displaying your workout data after a few seconds. This type of workout has no set duration and is known as Just Row or Just Ski. When doing a Just Row/Ski, the monitor counts up from zero.
Just Row/Just Ski workouts can be up to 50,000 meters, and you must row or ski for at least one minute for Just Row/Just Ski results to be saved in memory or on your LogCard. For more information, visit Just Row/Ski.
Single Distance
A Single Distance workout is when you program the monitor for a certain distance (500 meters, 5000 meters, 10000 meters, etc.) with the intention of completing the distance programmed. When doing a single distance piece, the monitor counts down from the number of meters programmed and displays the time to the tenth of a second at the finish.
Single Time
A Single Time workout is when you program the monitor for a certain time (30 minutes, an hour, etc.) with the intention of working out for the amount of time entered. When doing a single time piece, the monitor counts down from the amount of time programmed and displays your total meters at the finish.
Single Calorie
Note: This option is available on PM5s only.
A Single Calorie workout is when you program the monitor for a certain number of calories (20, 50, 70, etc.) with the intention of working out until you have burned the number of calories entered. When doing a single calorie piece, the monitor counts down from the number of calories programmed and displays your time to the tenth of the second at the finish. To view how many meters you completed during that time, view the result in memory.
To understand how the Performance Monitor calculates calories, visit the Calorie Calculator page.
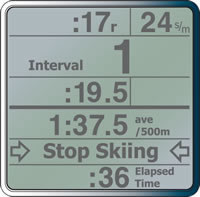
Intervals
Interval workouts are workouts that have periods (intervals) of work followed by rest time during which you might stop completely or, more typically, keep the flywheel spinning at a very easy pace. Interval workouts can be time based, distance based, calories based or variable:
- Time based—During each interval, you work for a predetermined amount of time and then rest for an amount of time before beginning the next work interval (see Setting Up a Time Interval Workout)
- Distance based—During each interval, you work for a predetermined distance and then rest for an amount of time before beginning the next work interval (see Setting Up a Distance Interval Workout)
- Calorie based—During each interval, you work until you burn a predetermined number of calories and then rest for an amount of time before beginning the next work interval.
- Variable—The workout contains a mix of time and/or distance intervals each followed by rest time (see Setting Up a Variable Interval Workout)
Rest Time—Predetermined or Undefined
When setting rest time for an interval workout, you can either specify a set amount of time or set the rest time to undefined, which allows the rest interval to be undetermined. Undefined rest is helpful for workouts such as CrossFit workouts that combine indoor rowing/skiing with other activities off the indoor rower or SkiErg (box jumps, kettle bell swings, etc). See Setting Up a Workout with Undefined Rest for more information.
Preset Workouts
Preset Workouts are pre-programmed workouts—workouts that are already set up in the Performance Monitor. The PM includes five standard workouts and five custom workouts. For more information, see:
Special
Special Workouts include Biathlon and Ergathlon. Biathlon alternates erg work with another test. Traditionally the sport of Biathlon includes target shooting, but any other challenge of accuracy can be used. Ergathlon is an event using all three Concept2 ergs. The PM5 offers a selection of Ergathlon distances to choose from.
 Biathlon combines two sports: typically Nordic skiing and target shooting. Races generally consist of three or five laps, with a shooting stage (“range”) between each lap. A penalty is assessed for each missed shot. Most often, this is a penalty lap of 150 extra meters of skiing.
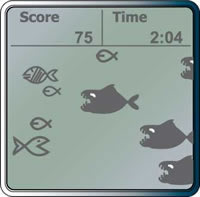 The Fish Game teaches you how to modulate intensity. The object of this game is to rack up as many points as possible by eating the nutritious fish while avoiding the large, toothy beasts that will send your score plummeting to the ocean floor.
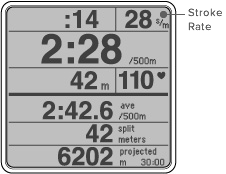 Stroke rate is the number of strokes you take per minute, or spm (Strokes Per Minute). The PM displays this number in the upper right corner on every workout display.