The first time you insert a LogCard in a Performance Monitor, the monitor will format that card and then prompt you to add a user:
Choose plus or minus to scroll through the alphabet as needed, then use the right arrow to navigate to the next space.
Select the checkmark icon to save the new user.
To add a user in the future:
Insert a LogCard in the Performance Monitor.
On the Welcome screen, select LogCard Menu.
Select LogCard Utilities.
Select Maintain Users.
Select Add User:
Choose plus or minus to scroll through the alphabet as needed.
Choose the right arrow to navigate to the next space.
Select the checkmark icon to save the new user.
Editing Users
Insert a LogCard in the Performance Monitor.
On the Welcome screen, select LogCard Menu.
Select LogCard Utilities.
Select Maintain Users.
Select Edit User.
Edit the lifetime meters and user name:
Choose plus or minus to increase/decrease the values and scroll through the alphabet as needed.
Choose the right arrow to navigate to the next digit/space.
Select the checkmark icon to save the changes.
Deleting Users
Insert a LogCard in the Performance Monitor.
On the Welcome screen, select LogCard Menu.
Select LogCard Utilities.
Select Maintain Users.
Select Delete User.
Select the user to delete.
Confirm the deletion.
Viewing Workouts in Memory
PM3s, PM4s and PM5s either store workouts to Memory, or to a USB flash drive (PM5s) or a LogCard (PM3s/PM4s) if those devices are in use. Stored workout information is displayed as a final result for the total distance or time and as a set of points (or segments) along the way called "splits."
Take the following steps to view workouts in PM Memory.
On a PM5
On the Main Menu, select Memory.
Choose how you want to see the workouts listed: List by Date or List by Type. If List by Type, then choose a specific type and select List Workouts.
Use the up and down arrows to navigate to the workout you want to view, and select the magnifying glass icon (fourth button on the right).
On a PM3 or PM4
On the Main Menu, select More Options.
Select Memory.
Choose how you want to see the workouts listed: List by Date or List by Type. If List by Type, then choose a specific type and select List Workouts.
Use the up and down arrows to navigate to the workout you want to view, and select the magnifying glass icon (fourth button on the right).
Viewing Lifetime Meters (Odometer)
On the Main Menu, select More Options.
Select Utilities.
(PM5 Only) Select More Utilities.
Select Product ID.
Select More information.
Lifetime Meters are displayed at the bottom of the screen.
You can reset the Lifetime Meters on a PM3, PM4 or PM5 by performing a hard factory reset (see below). Depending on the age of the monitor (PM3 or PM4 Firmware Versions less than 300), the Lifetime Meters can also be reset by removing the batteries for more than a few minutes. While Lifetime Meters may be an indicator of the amount of use or wear on a particular machine, it may be misleading if the Lifetime Meters are reset or if the monitor has been replaced during the life of the machine.
Hard Factory Reset
Method 1
Hold down the Units and Display buttons and use a paperclip to depress and release the "Reset" button in the back of the monitor. Continue holding the buttons down for at least 7 seconds or until the display flashes "Setting Factory Defaults" shows briefly. Then, release the buttons.
Method 2
Remove the battery and USB cable if attached. Hold down the Units and Display buttons. Re-install the battery. Continue holding the buttons down for at least 7 seconds or until the display flashes "Setting Factory Defaults" shows briefly. Then, release the buttons.
Viewing Drag Factor
Drag factor is a measure of fan load. The Performance Monitor self-calibrates on the RowErg and SkiErg by recalculating the drag factor on every pull, and the BikeErg needs to be calibrated from time to time. On all our ergs, you get a true measure of your effort regardless of the damper setting or changing conditions. You can adjust the drag factor by moving the damper lever on the flywheel. (Learn more about damper setting and drag factor)
To view drag factor on the PM:
On the Main Menu, select More Options.
Select Display Drag Factor.
Begin rowing, skiing or riding. The PM will display the drag factor after a few seconds.
A brand new RowErg will have a drag factor of 90 or less at a damper setting of 1 and 200 or more at a damper setting of 10.
A brand new SkiErg will have a drag factor of 55 or less at a damper setting of 1 and 150 or more at a damper setting of 10.
A brand new BikeErg will have a drag factor of 45 or less at a damper setting of 1 and 225 or more at a damper setting of 10.
These drag factor ranges for new ergs assumes that the machines are at sea level. Elevation has a large impact on air density and therefore drag factor. The monitor will accurately detect environmental changes and adjust the drag factor to assure accurate data.
Viewing Calories or Watts
At any time during a workout or when viewing results, you can press Units or Change Units to change the units the monitor displays from pace to Calories or watts. For information on the formulas used to calculate Calories or watts, visit the Calorie Calculator and Watts Calculator pages.
Using the Monitor Display Options
The Performance Monitor provides several display options. When you are rowing/skiing/riding, press Display or Change Display to cycle through the displays described below. You can also use the buttons on the right of the PM to access these displays:
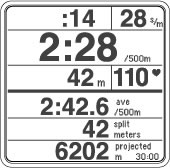
All Data provides the most comprehensive view of your workout. Depending on the type of workout you are doing (time, distance or interval), you can see the following information when looking at the All Data display:
Workout intensity, displayed stroke-by-stroke and expressed as either pace per 500 meters or 100 meters for the BikeErg, Calories or watts (see Understanding Units for more information)
Average workout intensity (in pace per 500 or 1000 meters, Calories or watts) or total time/meters
Split time, meters, pace, Calories or watts (see Understanding Splits for more information)
Projected finish, as follows:
For time workouts, this shows the number of meters you’ll complete by the end of the workout
For distance workouts, this shows how much time it will take you to complete the workout; for Just Row/Ski/Ride workouts, projected finish is 30 minutes
For interval workouts, this shows your projected finish distance or time for the interval
Monitor Display Options and Workout Data
1:58 Minutes
Force Curve
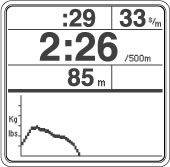
The Force Curve is an immediate graph of your power application during the stroke. When viewing the Force Curve display, the PM shows workout data on the top half of the screen and the force curve for each stroke on the bottom half.
The PaceBoat/PaceSkier/PaceRider display allows you to row/ski/ride against a target pace, illustrated by either a pace boat or a pace skier. When viewing the PaceBoat/PaceSkier/PaceRider display, the PM shows workout data on the top half of the screen and the pace boat, pace skier or pace rider on the bottom half.
You can define a target pace when setting up a new workout, or you can use the ReRow/ReSki/ReRide function to set the target pace to a pace from a workout done in the past. If you don’t set a target pace, the pace boat/skier/rider matches your current workout pace.
The Bar Chart display shows your power output in watts by painting a bar chart/graph for each stroke you take. (If you are using heart rate equipment, the Bar Chart displays heart rate intensity instead and paints a new bar every 10 seconds.) The higher the bar, the more power you have generated in that stroke, or the faster your heart is beating in that 10 second period.
When viewing the Bar Chart display, the PM shows workout data on the top half of the screen and the bar chart for each stroke on the bottom half.
Large Print
The Large Print display shows pertinent workout data in a large font for easier viewing.
Updating the Firmware
Firmware is the computer program that is embedded in and runs the Performance Monitor, and we recommend keeping your PM up to date with the most current firmware available for your monitor. Updating firmware requires a computer, our free Concept2 Utility and a USB cable. Learn more
Understanding Splits
The Performance Monitor displays workout results in two ways: as a final result for the total distance or time, and as a set of points (or segments) along the way called splits. The splits show how your pace varied through the workout.
In general, the performance monitors break a workout into fifths; so a split is 1/5 of a workout. There are a few exceptions to this. For example, splits for 2000m workouts are set at 500m, and splits for a marathon (42,195m) are set at 2000m. It is also possible to set your own split if you are setting up a new workout.
Splits apply to single distance or single time workouts. Interval workouts are not formatted to utilize splits.
Splits and Early Termination
When you end a single distance workout early (early termination), the monitor stores it as a "Just Row/Ski" workout; in other words, it stores the piece as if you had just gotten on the machine and started your workout without setting anything up on the monitor first.
"Just Row/Ski" workouts are stored with five minute splits, for a maximum of seven splits to save space. Once the monitor would need more than seven splits (that is, at the 35 minute mark of the workout), it begins storing 10 minute splits instead. If the workout time exceeds 70 minutes, the monitor begins storing 20 minute splits. This process continues as necessary to keep the workout to seven splits.
Turning Your Performance Monitor On/Off
The Performance Monitor turns on automatically when you do any of the following:
Pull the handle(s) on the RowErg or SkiErg, or start pedaling on the BikeErg (PM5s only)
Push a button on the PM
Connect the PM to a computer
Insert batteries
Insert a battery pack (applies to PM4s only)
Insert a LogCard into the PM (applies to PM3s and PM4s only)
The PM turns off automatically after a couple of minutes of inactivity. A spinning flywheel is considered activity, so the count starts once the flywheel stops.
Setting Language
On a PM5
Access the Main Menu. If you don’t understand the language the monitor is currently displaying, press Menu until the display stops changing. This means you have reached the Main Menu.
On the Main Menu, select More Options (the fifth gray button on the right side of the monitor), then select Utilities (the fifth gray button again).
Select Language (the second gray button on the right side of the monitor). You should now see the language selections.
On the right side of the monitor, press the button corresponding to the language you want to select.
On a PM3 or PM4
Access the Main Menu. If you don’t understand the language the monitor is currently displaying, press Menu | Back until the display stops changing. This means you have reached the Main Menu.
On the Main Menu, select More Options (the fifth gray button on the right side of the monitor).
Select Utilities (the second gray button on the right side of the monitor), and then select Language (the second gray button again). You should now see the language selections.
On the right side of the monitor, press the button corresponding to the language you want to select.
 All Data provides the most comprehensive view of your workout. Depending on the type of workout you are doing (time, distance or interval), you can see the following information when looking at the All Data display:
 The Force Curve is an immediate graph of your power application during the stroke. When viewing the Force Curve display, the PM shows workout data on the top half of the screen and the force curve for each stroke on the bottom half.
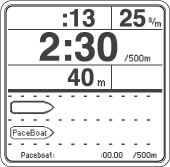 The PaceBoat/PaceSkier/PaceRider display allows you to row/ski/ride against a target pace, illustrated by either a pace boat or a pace skier. When viewing the PaceBoat/PaceSkier/PaceRider display, the PM shows workout data on the top half of the screen and the pace boat, pace skier or pace rider on the bottom half.
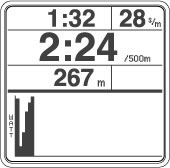 The Bar Chart display shows your power output in watts by painting a bar chart/graph for each stroke you take. (If you are using heart rate equipment, the Bar Chart displays heart rate intensity instead and paints a new bar every 10 seconds.) The higher the bar, the more power you have generated in that stroke, or the faster your heart is beating in that 10 second period.
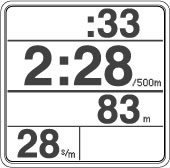 The Large Print display shows pertinent workout data in a large font for easier viewing.