PM3 | Page 3 | Concept2

PM3

Working with the Force Curve

The Force Curve is an immediate graph of your force application during the stroke. It shows how your total force varies as you use your legs, back and arms in sequence during the drive. A smoother-shaped curve indicates a smoother application of force. The greater the area under the curve, the better your results for that stroke will be. In general, you should strive for a broad arching Force Curve, without any sharp peaks or wobbles. This will show that you are achieving a smooth, continuous drive. If you have a coach, be sure to ask what he or she thinks your curve should look like.

Viewing Your Force Curve

To view the force curve, at anytime during a workout, either press Display or Change Display until you see the force curve at the bottom of the screen, or press the second button down on the right of the monitor.

Changing Your Force Curve

Change the shape of your Force Curve by varying the relative timing and emphasis of the legs, the back and the arms during the drive phase of the stroke. To learn more, visit our Training Section.

Using the PaceBoat/PaceSkier

There are two ways to set up the PaceBoat/PaceSkier feature. You can enter a value for the Optional PaceBoat/PaceSkier Setting whenever you are setting up a workout with the New Workout function or you can use the ReRow/ReSki function to use a split-by-split replay of a prior workout.

Note: In general, a split is 1/5 of a workout. There are a few exceptions to this; for example, splits for 2000m workouts are set at 500m, and splits for a marathon (42,195m) are set at 2000m. See Understanding Splits for more information.

Optional PaceBoat/PaceSkier Setting

This setting gives you a consistent PaceBoat/PaceSkier. You can define the Optional PaceBoat/PaceSkier Setting anytime you are setting up a workout with the New Workout function (Select Workout > New Workout). During your workout, the PaceBoat/PaceSkier setting is displayed at the bottom of the PM screen.

Using the ReRow/ReSki Function

Choose the ReRow/ReSki option when you want to re-do a past workout. To do this, you will either need a USB flash drive (PM5s only) or a LogCard (PM3s/PM4s) that contain past workouts, or have some workouts in the PM Memory.

Rowing or Skiing Against Another Person’s Workouts

There are three methods to row or ski against another person’s workouts:

  • Have the other person exercise without a LogCard or USB flash drive so that their workout will be stored in PM Memory. Then use the ReRow/ReSki option to select that workout and row/ski against it.
  • Have the other person ("Person A") row or ski with a LogCard or USB flash drive so their results are saved to the LogCard/USB flash drive. Use LogCard/USB flash drive > List by Type to find their workout. Select ReRow/ReSki, and then remove the LogCard/USB flash drive from the monitor. Person B now rows/skis, and has Person A's PaceBoat/PaceSkier driven by Person A's results. Person B's results will be stored to PM Memory. After the workout is complete, insert Person B's LogCard or USB flash drive and transfer the workout from PM Memory. Person B's results are now on Person B's LogCard/USB flash drive.
  • Use RowPro, which provides a rerow feature. RowPro is a third-party product developed by Digital Rowing and is not a Concept2 product.

Setting Up a Workout with Undefined Rest

These instructions apply to PM5s and any PM3 or PM4 with Undefined Rest capability.

The Undefined Rest feature allows you to program an interval workout where the length of the rest time is not predetermined. This is helpful for workouts such as CrossFit workouts that combine indoor rowing/skiing with other activities. For instance, if your workout is to complete as many rounds as possible of 500m of rowing followed by five box jumps in a certain amount of time, you can use the undefined rest feature for capturing the time it takes you to do the box jumps. You would set up this workout on the Performance Monitor as follows:

  1. On the Main Menu, choose Select Workout.
  2. Select New Workout.
  3. Select Intervals: Distance. The Intervals: Distance screen will display the default settings of 500m distance and 1:00 minute of rest time.
  4. Select the right arrow until “Set Rest Time” is blinking on the screen.
  5. Select the plus button. “Undefined Rest Time” is displayed.
  6. Select the checkbox icon and begin your rowing/skiing interval.

Continue rowing/skiing until the monitor prompts you to stop. This is the beginning of your first undefined rest time where you will complete the box jumps. When you are ready to start the next interval, select Continue and resume rowing/skiing.

When you have completed all intervals, press Menu or Menu | Back until the Main Menu is displayed.

Notes:

  • Undefined rest can be up to 10 minutes in length.
  • You can program up to 29 undefined rest intervals.
  • It is not possible to save undefined rest interval workouts as favorites or custom workouts.
  • If you ReRow/ReSki an undefined rest interval workout, the rest time will be defined by the amount of rest time you had when you originally did the workout, rounded down to the nearest five seconds.
  • You can also set up time and variable interval workouts with undefined rest intervals. See the CrossFit Workout Examples below for how to set up a variable interval workout with undefined rest.

Reviewing Results for Undefined Rest Interval Workouts

When reviewing results for undefined rest interval workouts, keep the following in mind:

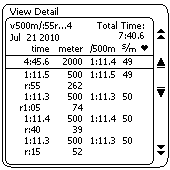
  • Total Time (upper right corner) shows total elapsed time (work plus rest times).
  • On the summary line, time is the sum of the work and does not include rest time.
  • The r:55 262 indicates that the rower/skier continued rowing/skiing after the monitor indicated for them to stop. As a result 262 meters were completed during the rest time.
  • The last interval may show a small amount of time with zero meters. This is to accommodate a software design limitation and ensures that the Total Time value for the piece is accurate.

CrossFit Workout Examples

These examples feature two CrossFit workouts—a modified Helen and a Rowing Fran—and illustrate how to set up a variable interval workout with undefined rest intervals.

Modified Helen Workout

  • Row 1200 meters
  • 63 Kettlebell swings
  • 36 Pull-ups
  • Row 800 meters
  • 42 Kettlebell swings
  • 24 Pull-ups
  • Row 400 meters
  • 21 Kettlebell swings
  • 12 Pull-ups

Setting Up the Monitor for Helen

  1. From the Main Menu go to Select Workout > New Workout > Intervals: Variable and set up the intervals as follows:
    • Interval 1: Select Distance.
      Set to 1200 meters and undefined rest.
    • Interval 2: Select Distance.
      Set to 800 meters and undefined rest.
    • Interval 3: Select Distance.
      Set to 400 meters and undefined rest.
  2. Select No more intervals.
  3. Row 1200 meters.
  4. Stop rowing and complete the Kettlebells and pull-ups.
  5. Return to the indoor rower and press Continue.
  6. Row 800 meters.
  7. Stop rowing and complete the Kettlebells and pull-ups.
  8. Return to the indoor rower and press Continue.
  9. Row 400 meters.
  10. Stop rowing and complete the Kettlebells and pull-ups.
  11. Press Menu or Menu | Back and review the results.

Rowing Fran Workout

Complete five rounds of the following for total time:

  • 21 thrusters, 21 pull-ups, 200 meters rowing
  • 18 thrusters, 18 pull-ups, 200 meters rowing
  • 15 thrusters, 15 pull-ups, 200 meters rowing
  • 12 thrusters, 12 pull-ups, 200 meters rowing
  • 9 thrusters, 9 pull-ups, 200 meters rowing

Setting Up the Monitor for Fran

  1. From the Main Menu go to Select Workout > New Workout > Intervals: Variable and set up the intervals as follows:
    • Interval 1: Select Time.
      Set to 0:20 seconds with undefined rest. This is necessary so that the PM4 can count the time for your first interval of thrusters and pull-ups.
    • Interval 2: Select Distance.
      Set to 200 meters with undefined rest.
    • Interval 3: Select Distance.
      Set to 200 meters with undefined rest.
    • Interval 4: Select Distance.
      Set to 200 meters with undefined rest.
    • Interval 5: Select Distance.
      Set to 200 meters with undefined rest.
    • Interval 6: Select Distance.
      Set to 200 meters with rest time of 0:00. This is necessary so that the timer stops as soon as you finish your last 200m row.
  2. When you see Interval 7 on the monitor. Select No more intervals.
  3. When you are ready to start, give the handle a tug to get the timer going.
  4. Do 21 thrusters and 21 pull-ups.
  5. Press Continue and then row 200 meters.
  6. Do 18 thrusters and 18 pull-ups.
  7. Press Continue and then row 200 meters.
  8. Do 15 thrusters and 15 pull-ups.
  9. Press Continue and then row 200 meters.
  10. Do 12 thrusters and 2 pull-ups.
  11. Press Continue and then row 200 meters.
  12. Do 9 thrusters and 9 pull-ups.
  13. Press Continue and then row 200 meters. At the end of the 200m the machine will stop counting and store your results.

Setting Up a Variable Interval Workout

  1. On the Main Menu, choose Select Workout.
  2. Select New Workout.
  3. Depending on your firmware version, either:
    • Select Intervals and then select Intervals: Variable, or
    • Select Intervals: Variable.
  4. On the Interval: Variables window for Interval 1, select Calorie (PM5 only), Distance or Time for the type of interval you want to define.
  5. Set the Calorie/distance/time for the work interval, the time for the rest interval and the PaceBoat/PaceSkier, as desired:
    • Choose plus or minus to increase/decrease the values as needed.
    • Choose the right and left arrows to navigate through the various digits.
  6. Select the checkmark icon to save the interval.
  7. Repeat steps 4–6 for the number of intervals you want to define.
  8. When you are finished defining intervals, select No More Intervals.
    • If you are using a LogCard or USB flash drive, the PM will prompt you to save the workout as a favorite. This is a good idea if this is a workout you do frequently. Select Yes to save the workout. Then, select the favorite you'd like to replace with the new workout.
    • If you do not want to save the workout as a favorite, select No.
  9. The PM5 allows a maximum of 50 intervals in a single workout.

Setting Up a Time Interval Workout

  1. On the Main Menu, choose Select Workout.
  2. Select New Workout.
  3. Depending on your firmware version, either:
    • Select Intervals and then select Intervals: Time, or
    • Select Intervals: Time.
  4. On the Intervals:Time window, set the workout time, split length, rest interval and PaceBoat/PaceSkier, as desired:
    • Choose plus or minus to increase/decrease the values as needed.
    • Choose the right and left arrows to navigate through the various digits.
  5. Select the checkmark icon to save the workout.
    • If you are using a LogCard or USB flash drive, the PM will prompt you to save the workout as a favorite. This is a good idea if this is a workout you do frequently. Select Yes to save the workout. Then, select the favorite you'd like to replace with the new workout.
    • If you do not want to save the workout as a favorite, select No.
  6. The PM5 allows a maximum of 50 intervals in a single workout.

Setting Up a Single Time Workout

  1. On the Main Menu, choose Select Workout.
  2. Select New Workout.
  3. Select Single Time.
  4. On the Set Time window, set the workout time, split length, and PaceBoat/PaceSkier, as desired:
    • Choose plus or minus to increase/decrease the values as needed.
    • Choose the right and left arrows to navigate through the various digits.
  5. Select the checkmark icon to save the workout.
    • If you are using a LogCard or USB flash drive, the PM will prompt you to save the workout as a favorite. This is a good idea if this is a workout you do frequently. Select Yes to save the workout. Then, select the favorite you'd like to replace with the new workout.
    • If you do not want to save the workout as a favorite, select No.

Setting Up a Single Distance Workout

Setting up a Distance Workout

1:00 Minute

  1. On the Main Menu, choose Select Workout.
  2. Select New Workout.
  3. Select Single Distance.
  4. On the Set Distance window, set the workout distance, split length, and PaceBoat/PaceSkier, as desired:
    • Choose plus or minus to increase/decrease the values as needed.
    • Choose the right and left arrows to navigate through the various digits.
  5. Select the checkmark icon to save the workout.
    • If you are using a LogCard or USB flash drive, the PM will prompt you to save the workout as a favorite. This is a good idea if this is a workout you do frequently. Select Yes to save the workout. Then, select the favorite you'd like to replace with the new workout.
    • If you do not want to save the workout as a favorite, select No.

Setting Up a Distance Interval Workout

  1. On the Main Menu, choose Select Workout.
  2. Select New Workout.
  3. Depending on your firmware version, either:
    • Select Intervals and then select Intervals: Distance, or
    • Select Intervals: Distance.
  4. On the Intervals: Distance window, set the work interval distance, rest interval time and PaceBoat/PaceSkier, as desired:
    • Choose plus or minus to increase/decrease the values as needed.
    • Choose the right and left arrows to navigate through the various digits.
  5. Select the checkmark icon to save the workout.
    • If you are using a LogCard or USB flash drive, the PM will prompt you to save the workout as a favorite. This is a good idea if this is a workout you do frequently. Select Yes to save the workout. Then, select the favorite you'd like to replace with the new workout.
    • If you do not want to save the workout as a favorite, select No.
  6. The PM5 allows a maximum of 50 intervals in a single workout.

Selecting a Preset Workout

The monitor is pre-programmed with five standard workouts, and five custom workouts.

To select a workout from the Standard List:

  1. On the Main Menu, choose Select Workout.
  2. Select Standard List.
  3. Select one of the five standard workouts:
    • 2000m—A set distance of 2000 meters.
    • 5000m—A set distance of 5000 meters.
    • 10000m—A set distance of 10000 meters.
    • 30:00—A set time of 30 minutes.
    • 500m/1:00r—An interval workout consisting of 500 meters of work followed by one minute of rest, repeated until you stop rowing/skiing (your last complete interval is the last one recorded).

To select a workout from the Custom List:

  1. On the Main Menu, choose Select Workout.
  2. Select Custom List.
  3. Select one of the five custom workouts:
    • :30/:30r—An interval workout of 30 seconds of work followed by 30 seconds of rest, repeated until you stop rowing/skiing (your last complete interval is the last one recorded).
    • v1:00/1:00r...7—A variable interval workout consisting of seven intervals (select the workout to view the interval details).
    • v2000m/3:00r...—A variable interval workout consisting of four intervals (select the workout to view the interval details).
    • v1:40/:20r...9—A variable interval workout consisting of nine intervals (select the workout to view the interval details).
    • 42,195—A set distance of 42,195 meters, which is considered a marathon.

Saving a Workout as a Favorite

Saving a workout as a favorite requires a LogCard (PM3s or PM4s) or a USB flash drive (PM5s only), because the favorites are actually saved to these devices. When using a LogCard or USB flash drive, the monitor will prompt you to save a workout as a favorite anytime you set up a new workout (predefined or custom workouts cannot be saved as favorites.) Select Yes when prompted, and then select which Favorite you want to replace. (Until you begin saving your own favorites, the Favorites list on the monitor will match the Custom list.)

Each LogCard/USB flash drive holds five favorites. You can also copy favorites to the Custom List, and then set up five new favorites for a total of 10 personalized workouts.

Pages