PM3 | Page 7 | Concept2

PM3

Cannot Update Firmware with the USB Cable and Concept2 Utility

If you have tried to update the firmware in your PM more than once and are encountering problems, follow the procedure below to reset the PM.

This topic applies to all PM3s, PM4s and PM5s when updating firmware using the Concept2 Utility and a USB cable.

On the PM5, press the first and 5th buttons down the right hand side, and the left-most button on the bottom

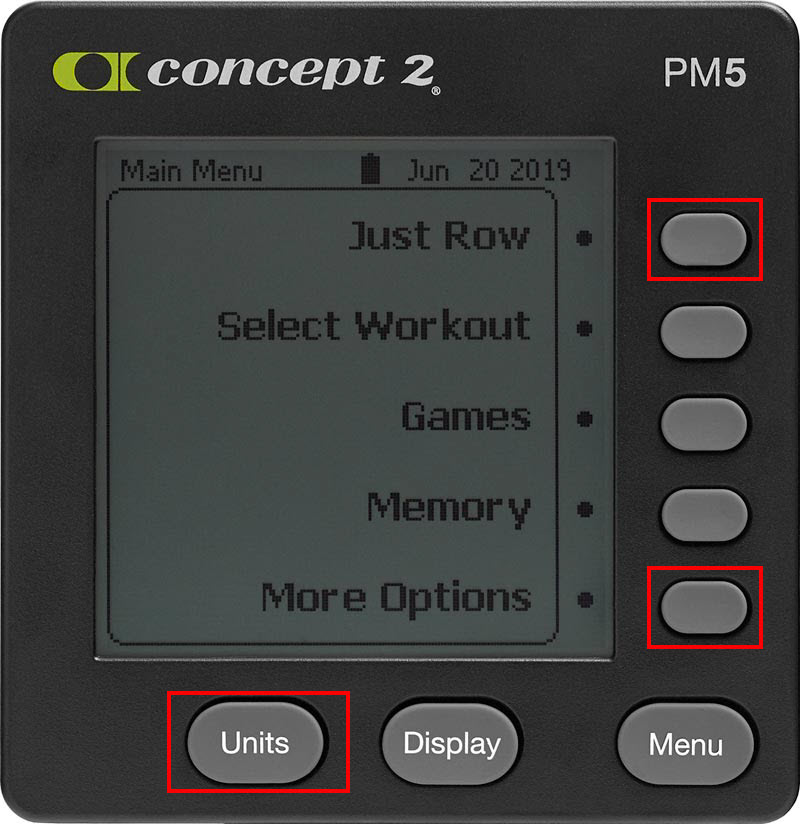
  1. Simultaneously press and hold the Change Units button, as well as the first and fifth gray buttons on the right (see image).
  2. While holding these buttons, reset the monitor using a paper clip and the reset button on the back of the monitor.
  3. Release the buttons when the PM displays "Concept2 Flash Loader.”
  4. If the issue is not resolved, close and restart the Concept2 Utility. If the issue persists, try rebooting your computer and attempting the update again.

If you have performed the reset and are still encountering problems with the update, please note the PM screen contents (error messages, etc.) and contact Concept2 for assistance (info@concept2.com or 800.245.5676).

Note for MacBook Users: If you have attempted the update multiple times without success, try another USB port. Some MacBook users have reported that this resolved the issue. If the problem persists, contact Concept2 for assistance.

For additional firmware update troubleshooting, see Concept2 Utility Troubleshooting.

Encountering Errors

If you encounter an error during the firmware update, recover the PM by taking the following steps and trying again:

  • Remove all other USB devices (printers, scanners, hubs, and so on) while updating your PM.
  • Try connecting your PM to a different USB port. Concept2 recommends plugging in directly to a USB port on your computer and not using a hub.
  • Try the update on another computer.

If you encounter a problem, we would like to hear from you. Please email info@concept2.com or contact Concept2 at 800.245.5676.

Buttons Not Working

Symptom 1

The monitor powers up and displays information, but one or more of the buttons on the monitor face (usually the Menu or Menu | Back button) do not work.

Resolution 1

This is a hardware issue, usually caused by corrosion on the circuit board. The PM must be replaced.

Symptom 2

Not all buttons on the monitor face power up the monitor. Only pressing certain buttons or rowing/skiing will power up the monitor. After the monitor is on, some buttons may not work unless pressing hard.

Resolution 2

The keypad may be aging or worn and cannot make the connection. The PM3/PM4 keypad, part number 1451, should be replaced. See also:

Broken USB Cable Jack

Symptom

The port (or jack) for the USB cable is loose. On the PM3 and PM4, this is the largest port on the bottom of the monitor. On a PM5, this port is on the back of the monitor and is located directly beneath the race system jacks. For help identifying the USB cable port, use the hover overs on the How To Use page for the monitor you have: PM3 | PM4 | PM5

Resolution

The USB cable port has broken off the circuit board. To resolve the issue, the PM must be replaced.

Battery Issues

Symptoms

  • Your Performance Monitor (PM) is warning you that the batteries are too low, but you think the batteries are OK.
  • You’re using D cell batteries in your PM, and the battery life seems short.

Resolution 1

This resolution applies to PMs installed on the following equipment:

  • Model D Indoor Rower
  • Model E Indoor Rower
  • Dynamic Indoor Rower
  • SkiErg

Take the following steps to determine whether the problem is with the generator cable or the battery.

Note: This procedure will not work for the combination of a PM5, hardware version 500–599, and Firmware Version 20/720. Please see this known issue for more information and alternatives, or update your monitor to Firmware Version 22/722 or higher.

  1. Remove all batteries from the PM.
  2. Ensure the “tach” (generator) cable is plugged in firmly and all the way.
  3. Row/ski hard on your machine.
    • If the PM comes on and stays on while you are rowing/skiing, then at least part of the generator is working. Proceed to step 4.
    • If the PM does not come on, then generator cable needs to be replaced, and you can stop following this diagnostic procedure.
  4. Install fresh D cell batteries in the PM. The PM should power up.
  5. Set the language and date (the year, at minimum).
  6. From the Main Menu:
    • (PM5 Only) Select More Options > Utilities > More Utilities > Product ID.
    • (PM3 or PM4 Only) Select More Options > Utilities > Product ID.
  7. Look at the Model type. Make sure it is set to D or D/E.
  8. If using a PM4, look at the firmware version and ensure your PM is running the most current version. If you have old firmware, the rechargeable battery will not work at all after a while. Your PM4 will work fine after updating the firmware and fully charging the battery pack.
  9. Press Menu or Menu | Back until you reach the Main Menu.
  10. Select Just Row/Ski.
  11. Start rowing/skiing:
    • If the numbers begin counting, then the generator appears to be working. Proceed to step 12.
    • If the numbers do not begin counting, stop this diagnostic procedure and replace the generator before proceeding.
  12. Stop, press Menu or Menu | Back while the flywheel is still spinning, and wait for 30–60 seconds. If you receive a low battery message, stop this diagnostic procedure and replace the generator.
  13. If using a PM4, remove the D cell batteries and install the rechargeable battery pack.
  14. If using a PM4, plug the PM into a USB port of a computer overnight to charge battery. Note: Concept2 recommends turning off your computer’s Hibernate or Sleep modes; otherwise, you may not get a good charge.

Resolution 2

This resolution applies only to monitors in use with Model A, B, or C Indoor Rowers.

Under normal circumstances, a set of Alkaline D cell batteries should last in a PM3 or PM4 for about 350 hours of operational time, and about 200 hours of operational time in a PM5. If you find this is not the case, take the following steps:

  1. Check your firmware version: From the Main Menu:
    • (PM5 Only) Select More Options > Utilities > More Utilities > Product ID.
    • (PM3 or PM4 Only) Select More Options > Utilities > Product ID.

    Running the latest version of the firmware may extend the life of batteries, as newer firmware uses the microprocessor more efficiently.

  2. Observe the performance monitor after rowing/skiing. The monitor should turn off within six minutes of the time you stop rowing (except when plugged into a computer, using PM4 racing, or during certain types of intervals). If it is not turning off within that timeframe, please contact Concept2 for assistance.
  3. Check the battery level: On the Main Menu select More Options > Utilities > Battery. Once the battery level gets down to about 80%, the battery percentage should not go down by more than 1% per day. If it does, there is probably damage to the circuit board and the unit should be replaced. In a health club, the most likely cause of this is spraying the monitor with cleaning chemicals.

Stuck on Zero

Symptom

The Performance Monitor (PM) comes on and you can navigate the menus, but when you begin rowing or skiing, the monitor numbers stay at zero.

Resolution

  1. Ensure the “tach” (generator) cable is plugged in fully.
  2. On indoor rowers, ensure the model type on the monitor matches the indoor rower in use. Check this as follows:
    1. On the Main Menu, choose More Options.
    2. Choose Utilities.
    3. On a PM5, chose More Utilities > Product ID. On a PM3 or PM4, choose Product ID. Look at what appears next to "Model." This should be D or D/E for Model Ds, and D/E for Model Es and Dynamic Indoor Rowers (for reference, D/E will also be listed for SkiErgs, but this procedure applies to indoor rowers only). If you have retrofitted a monitor to an older indoor rower, this should read C, B or A according to the indoor rower you have. If this doesn't match the indoor rower model you have, take the following steps:
      1. From the Main Menu:
        • (PM5 Only) Select More Options > Utilities > More Utilities > LCD Contrast.
        • (PM3 or PM4 Only) Select More Options > Utilities > LCD Contrast.
      2. Press Change Units or Units three times.
      3. Press Change Display or Display three times.
      4. When the Set Rower Type screen appears, press the button next to Change Type until the correct indoor model is displayed:
        • D or D/E for Model D Indoor Rowers
        • D/E for Model E and Dynamic Indoor Rowers
        • C, B or A as appropriate for the indoor rower you have, if you've retrofitted a monitor to an older machine
      5. Select Set Type to save the setting.

      Note: If you change the monitor batteries, you may need to follow this procedure again.
  3. If the problem persists:
    1. Unplug the monitor pickup wire and inspect it for frays or breaks. This is the wire that leads from the bottom of the monitor to the flywheel. If frays or breaks exist, the pickup wire will need to be replaced.
    2. Inspect the monitor pickup wire port on the bottom of the monitor. If there is a crack in the port, the monitor will need to be replaced.
    3. If the wire and port look fine, securely plug the wire back into the monitor.
  4. If the problem persists and you have access to a known working monitor, swap the monitors to determine whether the problem is with the monitor pickup wire or the monitor itself:
    1. If the known working monitor stays at zero when you begin your workout, the monitor pickup wire is faulty and must be replaced.
    2. If the known working monitor operates normally, the original monitor is faulty.
  5. If you do not have access to a known working monitor, contact Concept2 or your authorized dealer for further assistance. If the monitor is used in a health club or other setting where a user may have sprayed the machine down with a cleaning solution after use, inspect the inside of the monitor and the circuit board for contamination. To inspect the inside of the monitor:
    1. Disassemble the monitor.
    2. Inspect the circuit board. If contaminants are visible, wipe down the circuit board with a cloth slightly dampened with water.
    3. Allow the circuit board to dry and reassemble the PM.
    If the problem persists, or if no contaminants were visible on the circuit board, the PM must be replaced.

Pages