Oar length, along with other variables like spread, blade size, blade type, inboard, catch angle, and so on, determine the boat gearing, also known as rig or rigging. For a given rig, a longer oar gives a higher gear (heavier load) than a shorter oar.
Achieving a comfortable, effective rig is the key to keeping the load reasonable. In general, we recommend setting your oars or sculls shorter when rowing:
- With more efficient blades, like the Fat2.
- In a slower boat.
- With a narrower spread.
- With a longer reach/a greater catch angle.
- When you need less handle overlap while sculling.
Checking Oar Length
To check the overall length of your oars, measure the oar from the end of the grip to the end of the blade. If you have a hatchet-shaped blade (Fat2, Smoothie2 Vortex Edge, Smoothie2 Plain Edge, or Big Blade), continue your measurement through the center line of the oar through the blade. See the image below, or watch as Bob Beeman of the Concept2 Oars team shows you how to measure.
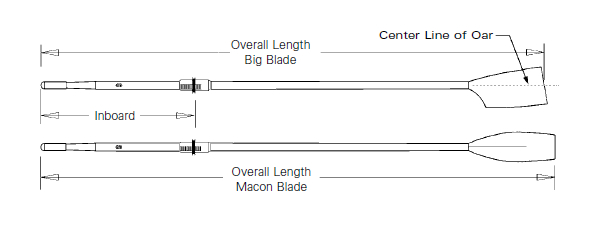
Measuring Oar Length
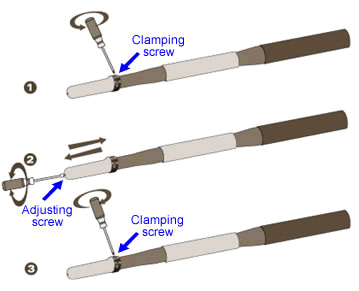
Setting Oar Length
We ship adjustable oars at their shortest length. The length range of your oars is indicated on the invoice packed with the oars. To adjust your oars to the desired length:
- Obtain the proper tool for your oars:
- A T20 6-Lobe driver (available at hardware stores) for adjustable oars shipped 4/18/2011 or later in the US and Canada (4/21/2011 or later globally).
- A Phillips head or flat blade screwdriver to adjust the clamping screw, and a 6 mm (or ¼ inch) socket wrench/nut for the adjustment screw on adjustable oars shipped prior to the dates above.
- Loosen the clamping screw at the shaft end of the grip. Do not remove it; just loosen it by several turns.
- Turn the adjusting screw at the very end of the grip until you reach your desired length. Apply a little forward pressure on the screw as you turn it. Turn clockwise to shorten the oar; counterclockwise to lengthen it. It takes approximately four turns to move one centimeter.
- Tighten the clamping screw until snug to lock the handle into position. Do not over tighten.
Troubleshooting Adjustable Sweeps and Sculls
If the locking clamp of the adjustable grip is facing the rower’s chest, remove the adjustable grip and reinstall it by aligning the double keyway with the double key. When correctly installed, the locking clamp on the grip should be facing the same direction as the face of the blade.