Email: [email protected]Phone: 800.245.5676
/support/monitors/pm3/how-to-use
How To Use Your PM3
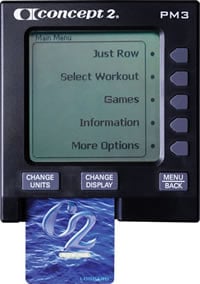
The instructions in this section apply to the most current version of PM3 Firmware. If your PM3 is running an older firmware version, your menu options may be different. We recommend running the most current firmware version available.
Basic Functions
The Performance Monitor turns on automatically when you do any of the following:
- Pull the handle(s) on the RowErg or SkiErg
- Push a button on the PM
- Connect the PM to a computer
- Insert batteries
- Insert a LogCard into the PM
The PM turns off automatically after a couple of minutes of inactivity. A spinning flywheel is considered activity, so the count starts once the flywheel stops.
When you first get your Performance Monitor (or if you work out at a gym), take the time to set the correct date and time on the monitor to ensure your results are associated with the proper date. It is not possible to edit the dates and times of past workouts, so it’s worth setting this information up correctly from the beginning.
- On the Main Menu, select More Options.
- Select Utilities.
- Select Date and Time.
- Set the correct date and time:
- Choose plus or minus to increase/decrease the values as needed.
- Choose the right and left arrows to navigate through the various digits.
- Select the checkmark icon to save the changes.
- Access the Main Menu. If you don’t understand the language the monitor is currently displaying, press Menu | Back until the display stops changing. This means you have reached the Main Menu.
- On the Main Menu, select More Options (the fifth gray button on the right side of the monitor).
- Select Utilities (the second gray button on the right side of the monitor), and then select Language (the second gray button again). You should now see the language selections.
- On the right side of the monitor, press the button corresponding to the language you want to select.
- On the Main Menu, select More Options.
- Select Utilities.
- Select LCD Contrast.
- Select Lighter or Darker, as desired.
- Press Menu or Menu | Back when you are satisfied with the contrast level.
The Performance Monitor provides several display options. When you are rowing/skiing/riding, press Display or Change Display to cycle through the displays described below. You can also use the buttons on the right of the PM to access these displays:
- 1st button—All Data
- 2nd button—Force Curve
- 3rd button— PaceBoat/PaceSkier
- 4th button—Bar Chart
- 5th button—Large Print
On any display, the PM will also show your heart rate, if you are using compatible heart rate equipment.
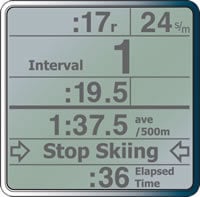
All Data

All Data provides the most comprehensive view of your workout. Depending on the type of workout you are doing (time, distance or interval), you can see the following information when looking at the All Data display:
- Time/distance elapsed/remaining
- Workout intensity, displayed stroke-by-stroke and expressed as either pace per 500 meters or 100 meters for the BikeErg, Calories or watts (see Understanding Units for more information)
- Average workout intensity (in pace per 500 meters, Calories or watts) or total time/meters
- Split time, meters, pace, Calories or watts (see Understanding Splits for more information)
- Projected finish, as follows:
- For time workouts, this shows the number of meters you’ll complete by the end of the workout
- For distance workouts, this shows how much time it will take you to complete the workout; for Just Row/Ski/Ride workouts, projected finish is 30 minutes
- For interval workouts, this shows your projected finish distance or time for the interval
Monitor Display Options and Workout Data
Force Curve
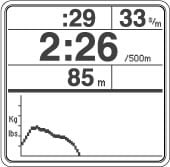
The Force Curve is an immediate graph of your power application during the stroke. When viewing the Force Curve display, the PM shows workout data on the top half of the screen and the force curve for each stroke on the bottom half.
For more information visit Working with the Force Curve.
PaceBoat/PaceSkier/PaceRider
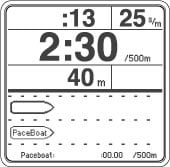
The PaceBoat/PaceSkier/PaceRider display allows you to row/ski/ride against a target pace, illustrated by either a pace boat or a pace skier. When viewing the PaceBoat/PaceSkier/PaceRider display, the PM shows workout data on the top half of the screen and the pace boat, pace skier or pace rider on the bottom half.
You can define a target pace when setting up a new workout, or you can use the ReRow/ReSki/ReRide function to set the target pace to a pace from a workout done in the past. If you don’t set a target pace, the pace boat/skier/rider matches your current workout pace.
For more information, visit Using the PaceBoat/PaceSkier.
Bar Chart
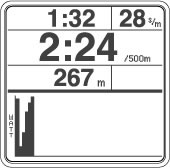
The Bar Chart display shows your power output in watts by painting a bar chart/graph for each stroke you take. (If you are using heart rate equipment, the Bar Chart displays heart rate intensity instead and paints a new bar every 10 seconds.) The higher the bar, the more power you have generated in that stroke, or the faster your heart is beating in that 10 second period.
When viewing the Bar Chart display, the PM shows workout data on the top half of the screen and the bar chart for each stroke on the bottom half.
Large Print
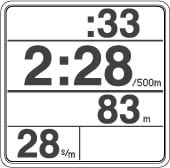
The Large Print display shows pertinent workout data in a large font for easier viewing.
At any time during a workout or when viewing results, you can press Units or Change Units to change the units the monitor displays from pace to Calories or watts. For information on the formulas used to calculate watts, visit the Watts Calculator page.
Drag factor is a measure of fan load. The Performance Monitor self-calibrates on the RowErg and SkiErg by recalculating the drag factor on every pull. On all our ergs, you get a true measure of your effort regardless of the damper setting or changing conditions. You can adjust the drag factor by moving the damper lever on the flywheel. (Learn more about damper setting and drag factor)
To view drag factor on the PM:
- On the Main Menu, select More Options.
- Select Display Drag Factor.
- Begin rowing, skiing or riding. The PM will display the drag factor after a few seconds.
A brand new RowErg will have a drag factor of 90 or less at a damper setting of 1 and 200 or more at a damper setting of 10.
A brand new SkiErg will have a drag factor of 55 or less at a damper setting of 1 and 150 or more at a damper setting of 10.
These drag factor ranges for new ergs assumes that the machines are at sea level. Elevation has a large impact on air density and therefore drag factor. The monitor will accurately detect environmental changes and adjust the drag factor to assure accurate data.
The Performance Monitor displays workout results in two ways: as a final result for the total distance or time, and as a set of points (or segments) along the way called splits. The splits show how your pace varied through the workout.
In general, the performance monitors break a workout into fifths; so a split is 1/5 of a workout. There are a few exceptions to this. For example, splits for 2000m workouts are set at 500m, and splits for a marathon (42,195m) are set at 2000m. It is also possible to set your own split if you are setting up a new workout.
Splits apply to single distance or single time workouts. Interval workouts are not formatted to utilize splits.
Splits and Early Termination
When you end a single distance workout early (early termination), the monitor stores it as a "Just Row/Ski" workout; in other words, it stores the piece as if you had just gotten on the machine and started your workout without setting anything up on the monitor first.
"Just Row/Ski" workouts are stored with five minute splits, for a maximum of seven splits to save space. Once the monitor would need more than seven splits (that is, at the 35 minute mark of the workout), it begins storing 10 minute splits instead. If the workout time exceeds 70 minutes, the monitor begins storing 20 minute splits. This process continues as necessary to keep the workout to seven splits.
The Performance Monitors are designed to power down after a couple of minutes of inactivity. To keep your monitor awake when you're taking a break during a long piece, periodically press Change Display or Change Units on the monitor face. This registers as activity for the monitor and will keep the monitor from shutting down.
Don't press Menu | Back as that will end your workout.
Just Row workouts longer than one minute or longer than 100 meters and preset workouts are saved to the PM automatically. After your last stroke of a Just Row workout, press Menu | Back twice and the meters rowed will be saved to memory. This can also be achieved by waiting 6 seconds after your last stroke and pressing Menu | Back once.
PM3s and PM4s store your 10 most recent workouts in memory. If you are using a LogCard with your PM, your workouts will be saved to those devices instead.
- On the Main Menu, select More Options.
- Select Utilities.
- Select Product ID.
- Select More information.
Lifetime Meters are displayed at the bottom of the screen.
You can reset the Lifetime Meters on a PM3 by performing a hard factory reset (see below). Depending on the age of the monitor (PM3 or PM4 Firmware Versions less than 300), the Lifetime Meters can also be reset by removing the batteries for more than a few minutes. While Lifetime Meters may be an indicator of the amount of use or wear on a particular machine, it may be misleading if the Lifetime Meters are reset or if the monitor has been replaced during the life of the machine.
Hard Factory Reset
Method 1
Hold down the Units and Display buttons and use a paperclip to depress and release the "Reset" button in the back of the monitor. Continue holding the buttons down for at least 7 seconds or until the display flashes "Setting Factory Defaults" shows briefly. Then, release the buttons.
Method 2
Remove the battery and USB cable if attached. Hold down the Units and Display buttons. Re-install the battery. Continue holding the buttons down for at least 7 seconds or until the display flashes "Setting Factory Defaults" shows briefly. Then, release the buttons.
PM3s either store workouts to Memory, or a LogCard if that device is being used. Stored workout information is displayed as a final result for the total distance or time and as a set of points (or segments) along the way called "splits."
Take the following steps to view workouts in PM Memory.
- On the Main Menu, select More Options.
- Select Memory.
- Choose how you want to see the workouts listed: List by Date or List by Type. If List by Type, then choose a specific type and select List Workouts.
- Use the up and down arrows to navigate to the workout you want to view, and select the magnifying glass icon (fourth button on the right).
Firmware is the computer program that is embedded in and runs the Performance Monitor, and we recommend keeping your PM up to date with the most current firmware available for your monitor. Updating firmware requires a computer, our free Concept2 Utility and a USB cable. Learn more
PM3s use two D cell batteries.
Checking the Battery Level
- On the Main Menu, select More Options.
- Select Utilities.
- Select Battery. The amount of power left will be displayed as a percentage.
- Power up the PM3 and access the Main Menu. (If you use a LogCard to turn on the PM3, or if there is a LogCard in the PM3 when you turn it on, you will need to select a user on the LogCard, and then select Main Menu.)
- From the Main Menu, select More Options > Utilities > Product ID. The PM3 displays the Product ID screen, which lists the firmware version the monitor is running.
The PM provides three different units for showing your workout intensity:
- Pace per 500 meters—How long it takes you to row or ski 500 meters: the smaller the value, the faster your pace. The monitor displays your pace per 500 meters for each stroke as well as your average pace per 500 meters for the workout.
- Watts—Your power output, in watts: the higher the value, the more power created. The monitor displays watts for each stroke as well as your average watts for the workout. For information about the formula used to determine watts or to calculate pace-to-watts or watts-to-pace, visit the Watts Calculator page.
- Calories—The number of Calories burned: the higher the value, the more Calories burned. During a workout, the monitor displays the total Calories burned and also translates this to a Calorie/hour value (when viewing results, the monitor displays the Calorie/hour value). To calculate Calories, the monitor uses a formula based on a 175 pound individual.
At any time during a workout or while viewing workout results, press Units or Change Units to view your workout intensity in a different unit; the PM cycles through the different units with each successive push of the button. In addition to pace, watts, and Calories, scrolling through units also displays total time or meters elapsed for the workout or interval, depending on the workout type.
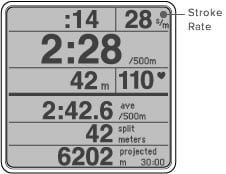
Stroke rate is the number of strokes you take per minute, or spm (Strokes Per Minute). The PM displays this number in the upper right corner on every workout display.
For rowing, a stroke rate between 24 and 30 strokes per minute is typical for most workouts. When racing, stroke rates are generally a bit higher but usually still below 36.
For skiing, the stroke rate will generally be between 30 and 40.
An important notion to understand is that an increased stroke rate does not necessarily mean that you are working out with more intensity. Instead, the key to increasing intensity is knowing how and when to apply power. Focus on getting as much power as you can into each drive/pull. To focus on this power:
- For rowing, think of using a ratio of one beat on each drive for every two beats on the recovery. In other words, don’t rush as you travel up the slide to take the next stroke. Instead, relax on the recovery as you prepare for the work of the next drive. See How to Row Harder for more information.
- For skiing, the drive and recovery are generally much closer in length.
As you do this, watch the PM for immediate feedback on your intensity. As your intensity increases, your pace per 500 meters will decrease, and your watts and calories will increase. For more information on monitoring intensity, see Understanding and Changing Units.
- Power up the PM and access the Main Menu.
- From the Main Menu select More Options > Utilities > More Utilities > Product ID.
The hardware version number will be listed as "PM Hardware Version" near the top of the Product ID window.
Advanced Functions
The PM3 can receive and display heart rate information from a Polar chest belt if you are using the Concept2 heart rate receiver and cable.
For more information, visit:
There are two ways to set up the PaceBoat/PaceSkier feature. You can enter a value for the Optional PaceBoat/PaceSkier Setting whenever you are setting up a workout with the New Workout function or you can use the ReRow/ReSki function to use a split-by-split replay of a prior workout.
Note: In general, a split is 1/5 of a workout. There are a few exceptions to this; for example, splits for 2000m workouts are set at 500m, and splits for a marathon (42,195m) are set at 2000m. See Understanding Splits for more information.
Optional PaceBoat/PaceSkier Setting
This setting gives you a consistent PaceBoat/PaceSkier. You can define the Optional PaceBoat/PaceSkier Setting anytime you are setting up a workout with the New Workout function (Select Workout > New Workout). During your workout, the PaceBoat/PaceSkier setting is displayed at the bottom of the PM screen.
Using the ReRow/ReSki Function
Choose the ReRow/ReSki option when you want to re-do a past workout. To do this, you will either need a USB flash drive (PM5s only) or a LogCard (PM3s/PM4s) that contain past workouts, or have some workouts in the PM Memory.
Rowing or Skiing Against Another Person’s Workouts
There are three methods to row or ski against another person’s workouts:
- Have the other person exercise without a LogCard so that their workout will be stored in PM Memory. Then use the ReRow/ReSki option to select that workout and row/ski against it.
- Have the other person ("Person A") row or ski with a LogCard so their results are saved to the LogCard. Use LogCard > List by Type to find their workout. Select ReRow/ReSki, and then remove the LogCard from the monitor. Person B now rows/skis, and has Person A's PaceBoat/PaceSkier driven by Person A's results. Person B's results will be stored to PM Memory. After the workout is complete, insert Person B's LogCard and transfer the workout from PM Memory. Person B's results are now on Person B's LogCard.
- Use RowPro, which provides a rerow feature. RowPro is a third-party product developed by Digital Rowing and is not a Concept2 product.
When using a compatible heart rate chest belt, the PM3, PM4 and PM5 store heart rate data as follows:
- Splits: The PM stores the last good heart rate at the end of a split.
- Interval work period: The PM stores the last good heart rate at the end of the interval.
- Rest when doing a variable interval workout: The PM stores the ending heart rate.
- Rest when doing a time or distance interval workout: The ending heart rate is not stored.
Verification codes are used primarily for Concept2 world and national records. They are not needed or required to participate in the Concept2 Online Logbook, Rankings, or challenges.
The PM3, PM4 and PM5 monitors generate a verification code for each piece. This is a 16-digit code that is based on workout date, distance and duration. If you are entering a piece for the Online Rankings, you may want to edit your online logbook entry using the pencil icon and enter this code. Doing so will mark your piece as verified in the Ranking. Note: there is no need to enter a verification code if you are uploading your results using the Concept2 Utility or ErgData app, as these pieces are considered verified automatically.
To get the verification code for a piece:
- Ensure your PM is running the latest firmware.
- Ensure the date and time on your PM is accurate.
- Take care when setting up your workout, and complete your piece.
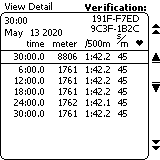
- After you have completed your piece, select (View Detail) for the piece.
- If you are using a LogCard, go to LogCard Menu > List By Date and select the magnifying glass icon for the workout you want to view.
- If you are not using a LogCard, go to Main Menu > More Options > Memory and select the magnifying glass icon for the workout you want to view.
- On the View Detail screen, the fourth gray button on the right has no action associated with it. Press this button twice. The 16-digit verification code will be displayed in the upper right hand corner of the monitor.
If you have any questions or difficulties, please email [email protected].
The Force Curve is an immediate graph of your force application during the stroke. It shows how your total force varies as you use your legs, back and arms in sequence during the drive. A smoother-shaped curve indicates a smoother application of force. The greater the area under the curve, the better your results for that stroke will be. In general, you should strive for a broad arching Force Curve, without any sharp peaks or wobbles. This will show that you are achieving a smooth, continuous drive. If you have a coach, be sure to ask what he or she thinks your curve should look like.
Viewing Your Force Curve
To view the force curve, at anytime during a workout, either press Display or Change Display until you see the force curve at the bottom of the screen, or press the second button down on the right of the monitor.
Changing Your Force Curve
Change the shape of your Force Curve by varying the relative timing and emphasis of the legs, the back and the arms during the drive phase of the stroke. To learn more, visit our Training Section.
Setting Up Workouts
The PM allows you to program several types of workouts…or none at all if that’s your preference. Read on to learn the basics.
Just Row/Ski
If you’re not the button-pushing type, just hop on an indoor rower or SkiErg and start pulling; the monitor will power up and begin displaying your workout data after a few seconds. This type of workout has no set duration and is known as Just Row or Just Ski. When doing a Just Row/Ski, the monitor counts up from zero.
Just Row/Just Ski workouts can be up to 50,000 meters, and you must row or ski for at least one minute for Just Row/Just Ski results to be saved in memory or on your LogCard. For more information, visit Just Row/Ski.
Single Distance
A Single Distance workout is when you program the monitor for a certain distance (500 meters, 5000 meters, 10000 meters, etc.) with the intention of completing the distance programmed. When doing a single distance piece, the monitor counts down from the number of meters programmed and displays the time to the tenth of a second at the finish.
Single Time
A Single Time workout is when you program the monitor for a certain time (30 minutes, an hour, etc.) with the intention of working out for the amount of time entered. When doing a single time piece, the monitor counts down from the amount of time programmed and displays your total meters at the finish.
Single Calorie
Note: This option is available on PM5s only.
A Single Calorie workout is when you program the monitor for a certain number of calories (20, 50, 70, etc.) with the intention of working out until you have burned the number of calories entered. When doing a single calorie piece, the monitor counts down from the number of calories programmed and displays your time to the tenth of the second at the finish. To view how many meters you completed during that time, view the result in memory.
To understand how the Performance Monitor calculates calories, visit the Calorie Calculator page.
Intervals
Interval workouts are workouts that have periods (intervals) of work followed by rest time during which you might stop completely or, more typically, keep the flywheel spinning at a very easy pace. Interval workouts can be time based, distance based, calories based or variable:
- Time based—During each interval, you work for a predetermined amount of time and then rest for an amount of time before beginning the next work interval (see Setting Up a Time Interval Workout)
- Distance based—During each interval, you work for a predetermined distance and then rest for an amount of time before beginning the next work interval (see Setting Up a Distance Interval Workout)
- Calorie based—During each interval, you work until you burn a predetermined number of calories and then rest for an amount of time before beginning the next work interval.
- Variable—The workout contains a mix of time and/or distance intervals each followed by rest time (see Setting Up a Variable Interval Workout)
Rest Time—Predetermined or Undefined
When setting rest time for an interval workout, you can either specify a set amount of time or set the rest time to undefined, which allows the rest interval to be undetermined. Undefined rest is helpful for workouts such as CrossFit workouts that combine indoor rowing/skiing with other activities off the indoor rower or SkiErg (box jumps, kettle bell swings, etc). See Setting Up a Workout with Undefined Rest for more information.
Preset Workouts
Preset Workouts are pre-programmed workouts—workouts that are already set up in the Performance Monitor. The PM includes five standard workouts and five custom workouts. For more information, see:
Special
Special Workouts include Biathlon. Biathlon alternates erg work with another test. Traditionally the sport of Biathlon includes target shooting, but any other challenge of accuracy can be used.
A Just Row or Just Ski workout is a workout without a set distance or time. For example, if you just begin rowing without pushing any monitor buttons, you are doing a “Just Row” workout. On a Just Row/Just Ski workout, the Performance Monitor will power up and begin recording your workout data after a few seconds.
You can also select a Just Row/Just Ski workout on the monitor as follows:
- On the Main Menu, select Just Row (or Just Ski).
Note: You must row or ski for at least one minute or 100 meters for Just Row/Just Ski results to be saved in memory or on your LogCard. After your last stroke of a Just Row workout, press Menu or Menu | Back twice and the meters rowed will be saved. This can also be achieved by waiting 6 seconds after your last stroke and pressing Menu or Menu | Back once. Just Row/Just Ski workouts can be up to 50,000 meters.
The monitor is pre-programmed with five standard workouts, and five custom workouts.
To select a workout from the Standard List:
- On the Main Menu, choose Select Workout.
- Select Standard List.
- Select one of the five standard workouts:
- 2000m—A set distance of 2000 meters.
- 5000m—A set distance of 5000 meters.
- 10000m—A set distance of 10000 meters.
- 30:00—A set time of 30 minutes.
- 500m/1:00r—An interval workout consisting of 500 meters of work followed by one minute of rest, repeated until you stop rowing/skiing (your last complete interval is the last one recorded).
To select a workout from the Custom List:
- On the Main Menu, choose Select Workout.
- Select Custom List.
- Select one of the five custom workouts:
- :30/:30r—An interval workout of 30 seconds of work followed by 30 seconds of rest, repeated until you stop rowing/skiing (your last complete interval is the last one recorded).
- v1:00/1:00r...7—A variable interval workout consisting of seven intervals (select the workout to view the interval details).
- v2000m/3:00r...—A variable interval workout consisting of four intervals (select the workout to view the interval details).
- v1:40/:20r...9—A variable interval workout consisting of nine intervals (select the workout to view the interval details).
- 42,195—A set distance of 42,195 meters, which is considered a marathon.
- On the Main Menu, choose Select Workout.
- Select New Workout.
- Select Single Time.
- On the Set Time window, set the workout time, split length, and PaceBoat/PaceSkier, as desired:
- Choose plus or minus to increase/decrease the values as needed.
- Choose the right and left arrows to navigate through the various digits.
- Select the checkmark icon to save the workout.
- If you are using a LogCard or USB flash drive, the PM will prompt you to save the workout as a favorite. This is a good idea if this is a workout you do frequently. Select Yes to save the workout. Then, select the favorite you'd like to replace with the new workout.
- If you do not want to save the workout as a favorite, select No.
- On the Main Menu, choose Select Workout.
- Select New Workout.
- Select Single Distance.
- On the Set Distance window, set the workout distance, split length, and PaceBoat/PaceSkier, as desired:
- Choose plus or minus to increase/decrease the values as needed.
- Choose the right and left arrows to navigate through the various digits.
- Select the checkmark icon to save the workout.
- If you are using a LogCard or USB flash drive, the PM will prompt you to save the workout as a favorite. This is a good idea if this is a workout you do frequently. Select Yes to save the workout. Then, select the favorite you'd like to replace with the new workout.
- If you do not want to save the workout as a favorite, select No.
- On the Main Menu, choose Select Workout.
- Select New Workout.
- Depending on your firmware version, either:
- Select Intervals and then select Intervals: Time, or
- Select Intervals: Time.
- On the Intervals:Time window, set the workout time, split length, rest interval and PaceBoat/PaceSkier, as desired:
- Choose plus or minus to increase/decrease the values as needed.
- Choose the right and left arrows to navigate through the various digits.
- Select the checkmark icon to save the workout.
- If you are using a LogCard or USB flash drive, the PM will prompt you to save the workout as a favorite. This is a good idea if this is a workout you do frequently. Select Yes to save the workout. Then, select the favorite you'd like to replace with the new workout.
- If you do not want to save the workout as a favorite, select No.
- The PM5 allows a maximum of 50 intervals in a single workout.
- On the Main Menu, choose Select Workout.
- Select New Workout.
- Depending on your firmware version, either:
- Select Intervals and then select Intervals: Distance, or
- Select Intervals: Distance.
- On the Intervals: Distance window, set the work interval distance, rest interval time and PaceBoat/PaceSkier, as desired:
- Choose plus or minus to increase/decrease the values as needed.
- Choose the right and left arrows to navigate through the various digits.
- Select the checkmark icon to save the workout.
- If you are using a LogCard or USB flash drive, the PM will prompt you to save the workout as a favorite. This is a good idea if this is a workout you do frequently. Select Yes to save the workout. Then, select the favorite you'd like to replace with the new workout.
- If you do not want to save the workout as a favorite, select No.
- On the Main Menu, choose Select Workout.
- Select New Workout.
- Depending on your firmware version, either:
- Select Intervals and then select Intervals: Variable, or
- Select Intervals: Variable.
- On the Interval: Variables window for Interval 1, select Calorie (PM5 only), Distance or Time for the type of interval you want to define.
- Set the Calorie/distance/time for the work interval, the time for the rest interval and the PaceBoat/PaceSkier, as desired:
- Choose plus or minus to increase/decrease the values as needed.
- Choose the right and left arrows to navigate through the various digits.
- Select the checkmark icon to save the interval.
- Repeat steps 4–6 for the number of intervals you want to define.
- When you are finished defining intervals, select No More Intervals.
- If you are using a LogCard, the PM will prompt you to save the workout as a favorite. This is a good idea if this is a workout you do frequently. Select Yes to save the workout. Then, select the favorite you'd like to replace with the new workout.
- If you do not want to save the workout as a favorite, select No.
These instructions apply to any PM3 with Undefined Rest capability.
The Undefined Rest feature allows you to program an interval workout where the length of the rest time is not predetermined. This is helpful for workouts such as CrossFit workouts that combine indoor rowing/skiing with other activities. For instance, if your workout is to complete as many rounds as possible of 500m of rowing followed by five box jumps in a certain amount of time, you can use the undefined rest feature for capturing the time it takes you to do the box jumps. You would set up this workout on the Performance Monitor as follows:
- On the Main Menu, choose Select Workout.
- Select New Workout.
- Select Intervals: Distance. The Intervals: Distance screen will display the default settings of 500m distance and 1:00 minute of rest time.
- Select the right arrow until “Set Rest Time” is blinking on the screen.
- Select the plus button. “Undefined Rest Time” is displayed.
- Select the checkbox icon and begin your rowing/skiing interval.
Continue rowing/skiing until the monitor prompts you to stop. This is the beginning of your first undefined rest time where you will complete the box jumps. When you are ready to start the next interval, select Continue and resume rowing/skiing.
When you have completed all intervals, press Menu or Menu | Back until the Main Menu is displayed.
Notes:
- Undefined rest can be up to 10 minutes in length.
- You can program up to 29 undefined rest intervals.
- It is not possible to save undefined rest interval workouts as favorites or custom workouts.
- If you ReRow/ReSki an undefined rest interval workout, the rest time will be defined by the amount of rest time you had when you originally did the workout, rounded down to the nearest five seconds.
- You can also set up time and variable interval workouts with undefined rest intervals. See the CrossFit Workout Examples below for how to set up a variable interval workout with undefined rest.
Reviewing Results for Undefined Rest Interval Workouts
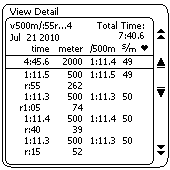
When reviewing results for undefined rest interval workouts, keep the following in mind:
- Total Time (upper right corner) shows total elapsed time (work plus rest times).
- On the summary line, time is the sum of the work and does not include rest time.
- The r:55 262 indicates that the rower/skier continued rowing/skiing after the monitor indicated for them to stop. As a result 262 meters were completed during the rest time.
- The last interval may show a small amount of time with zero meters. This is to accommodate a software design limitation and ensures that the Total Time value for the piece is accurate.
CrossFit Workout Examples
These examples feature two CrossFit workouts—a modified Helen and a Rowing Fran—and illustrate how to set up a variable interval workout with undefined rest intervals.
Modified Helen Workout
- Row 1200 meters
- 63 Kettlebell swings
- 36 Pull-ups
- Row 800 meters
- 42 Kettlebell swings
- 24 Pull-ups
- Row 400 meters
- 21 Kettlebell swings
- 12 Pull-ups
Setting Up the Monitor for Helen
- From the Main Menu go to Select Workout > New Workout > Intervals: Variable and set up the intervals as follows:
- Interval 1: Select Distance.
Set to 1200 meters and undefined rest. - Interval 2: Select Distance.
Set to 800 meters and undefined rest. - Interval 3: Select Distance.
Set to 400 meters and undefined rest.
- Interval 1: Select Distance.
- Select No more intervals.
- Row 1200 meters.
- Stop rowing and complete the Kettlebells and pull-ups.
- Return to the indoor rower and press Continue.
- Row 800 meters.
- Stop rowing and complete the Kettlebells and pull-ups.
- Return to the indoor rower and press Continue.
- Row 400 meters.
- Stop rowing and complete the Kettlebells and pull-ups.
- Press Menu or Menu | Back and review the results.
Rowing Fran Workout
Complete five rounds of the following for total time:
- 21 thrusters, 21 pull-ups, 200 meters rowing
- 18 thrusters, 18 pull-ups, 200 meters rowing
- 15 thrusters, 15 pull-ups, 200 meters rowing
- 12 thrusters, 12 pull-ups, 200 meters rowing
- 9 thrusters, 9 pull-ups, 200 meters rowing
Setting Up the Monitor for Fran
- From the Main Menu go to Select Workout > New Workout > Intervals: Variable and set up the intervals as follows:
- Interval 1: Select Time.
Set to 0:20 seconds with undefined rest. This is necessary so that the PM4 can count the time for your first interval of thrusters and pull-ups. - Interval 2: Select Distance.
Set to 200 meters with undefined rest. - Interval 3: Select Distance.
Set to 200 meters with undefined rest. - Interval 4: Select Distance.
Set to 200 meters with undefined rest. - Interval 5: Select Distance.
Set to 200 meters with undefined rest. - Interval 6: Select Distance.
Set to 200 meters with rest time of 0:00. This is necessary so that the timer stops as soon as you finish your last 200m row.
- Interval 1: Select Time.
- When you see Interval 7 on the monitor. Select No more intervals.
- When you are ready to start, give the handle a tug to get the timer going.
- Do 21 thrusters and 21 pull-ups.
- Press Continue and then row 200 meters.
- Do 18 thrusters and 18 pull-ups.
- Press Continue and then row 200 meters.
- Do 15 thrusters and 15 pull-ups.
- Press Continue and then row 200 meters.
- Do 12 thrusters and 2 pull-ups.
- Press Continue and then row 200 meters.
- Do 9 thrusters and 9 pull-ups.
- Press Continue and then row 200 meters. At the end of the 200m the machine will stop counting and store your results.
Saving a workout as a favorite requires a LogCard, because the favorites are actually saved to these devices. When using a LogCard, the monitor will prompt you to save a workout as a favorite anytime you set up a new workout (predefined or custom workouts cannot be saved as favorites.) Select Yes when prompted, and then select which Favorite you want to replace. (Until you begin saving your own favorites, the Favorites list on the monitor will match the Custom list.)
Each LogCard holds five favorites. You can also copy favorites to the Custom List, and then set up five new favorites for a total of 10 personalized workouts.
Choose the ReRow/ReSki option when you want to re-do a past workout. To use ReRow/ReSki, you will either need a LogCard that contains past workouts or have some workouts in the monitor’s memory. The ReRow/ReSki function sets the speed of the pacer based on your previous performance.
Note: The ReRow/ReSki feature only works for pieces with set distances, set times, set intervals, and so on; pieces done as a Just Row/Just Ski/Just Ride are not available for ReRow/ReSki/.
Without LogCard
- On the Main Menu, choose Select Workout.
- Select ReRow/ReSki.
- You will see a chronological list of past workouts. Use the up and down arrows to navigate the list.
- Navigate to the workout you want to rerow/reski. (Select the magnifier icon to view the workout details.)
- With the workout selected, choose ReRow/ReSki.
With LogCard
- On the Main Menu, choose Select Workout.
- Select ReRow/ReSki.
- Select the type of workout you would like to row or ski against (Single Distance, Intervals: Time, and so on). You will see a list of past workouts that match the type of workout you selected (for example, if you selected "Single Distances" you might see 10000m, 5000m, and so on, listed on the display).
- Use the up and down arrows to navigate the list.
- Select List Workouts to see all the workouts in that category.
- Navigate to the workout you want to rerow/reski. (Select the magnifier icon to view the workout details.)
- With the workout selected, choose ReRow/ReSki.
Biathlon combines two sports: typically Nordic skiing and target shooting. Races generally consist of three or five laps, with a shooting stage (“range”) between each lap. A penalty is assessed for each missed shot. Most often, this is a penalty lap of 150 extra meters of skiing.
You can use the Biathlon Workout to ski or row intervals alternating with target shooting or some other activity. You can choose from several penalty distances, or no penalty at all:
- With penalty: Penalty distances are calculated after each range interval and must be completed before the next interval begins.
- Without penalty: No penalty distances are calculated. You will simply have an undefined rest time of up to 10 minutes between your intervals.
The computer keeps track of your range time and your total elapsed time. Penalty laps show up on the logged workout detail as a separate interval with zero rest. You can Re-Ski or Re-Row the workout, but penalty intervals and range time will be exactly as they were when you completed the workout originally.
To set up a Biathlon, from the Main Menu choose Select Workout > New Workout > Special > Biathlon.
During set up, choose the number of intervals you want (from 2 to 15), the interval length, and whether you want a penalty (choose from none to 250m in 50m increments). Do your first interval. When you complete it, the rest or range time begins, and the PM will prompt you to stop skiing or rowing. Once you’ve stopped, the penalty screen will appear on the PM:
- Playing with penalty: After completing your range time, press the button that corresponds to the number of penalties you incurred (from 0 to 5). For example, if you were shooting, choose the number of shots missed. The PM calculates the penalty distance based on what you selected during set up (selected penalty increment multiplied by the number of penalties/shots missed equals the penalty lap distance). Do the penalty lap. When you are done, your next interval begins.
- Playing without penalty: Simply press Continue when you are ready to begin your next interval.
Notes:
- Only PM3s running PM3 Firmware Version 303 or higher include Biathlon.
- The menu path for setting up a Biathlon starts at the Main Menu and is Games > More Games > Biathlon.
LogCard
The LogCard is a smart card that is used with your Performance Monitor to save your workout data. We included a LogCard with every new purchase of an indoor rower, SkiErg, or PM retrofit kit that included the PM3.
Although using a LogCard is not required, it’s a handy way to store and manage your workout data. With a LogCard, you can use the free Concept2 Utility software to upload your workouts to your online logbook as well as transfer your workout information to a spreadsheet on your computer.
To properly insert the LogCard in the PM, the chip should be facing up and the arrow pointing into the LogCard slot on the PM. The first time you insert a LogCard into the PM, the PM formats the card for use. Do not remove the card while this is in-progress.
Each LogCard stores approximately 300 workouts. This capacity varies depending on the complexity of the workout. Interval workouts, for example, require more space than set distance or time workouts.
Each LogCard can hold up to five users.
Adding Users
The first time you insert a LogCard in a Performance Monitor, the monitor will format that card and then prompt you to add a user:
- Choose plus or minus to scroll through the alphabet as needed, then use the right arrow to navigate to the next space.
- Select the checkmark icon to save the new user.
To add a user in the future:
- Insert a LogCard in the Performance Monitor.
- On the Welcome screen, select LogCard Menu.
- Select LogCard Utilities.
- Select Maintain Users.
- Select Add User:
- Choose plus or minus to scroll through the alphabet as needed.
- Choose the right arrow to navigate to the next space.
- Select the checkmark icon to save the new user.
Editing Users
- Insert a LogCard in the Performance Monitor.
- On the Welcome screen, select LogCard Menu.
- Select LogCard Utilities.
- Select Maintain Users.
- Select Edit User.
- Edit the lifetime meters and user name:
- Choose plus or minus to increase/decrease the values and scroll through the alphabet as needed.
- Choose the right arrow to navigate to the next digit/space.
- Select the checkmark icon to save the changes.
Deleting Users
- Insert a LogCard in the Performance Monitor.
- On the Welcome screen, select LogCard Menu.
- Select LogCard Utilities.
- Select Maintain Users.
- Select Delete User.
- Select the user to delete.
- Confirm the deletion.
The LogCard stores a lifetime meters value for each user on the LogCard. If you previously kept a paper log of your workouts, or if you completed workouts without your LogCard, you may want to update your lifetime meter value to include those meters. Take the following steps:
- From the Main Menu, select More Options.
- Select LogCard.
- Select LogCard Utilities.
- Select Maintain Users.
- Select Edit User.
- Update the lifetime meters displayed by using the arrow selections to navigate through the digits, and the plus and minus selections to increase/decrease the values.
- Select the checkmark icon to save the changes.
The LogCard stores up to five favorite workouts for each user. Use the Copy Favorites function to copy those favorites to the Custom List. You can then set up five new favorites for a total of 10 personalized workouts.
- Insert the LogCard in the Performance Monitor.
- On the Main Menu, select More Options.
- Select LogCard.
- Select LogCard Utilities.
- Select Edit Custom List.
- Select the favorites to copy:
- Select Copy All to copy all of the favorite workouts to the Custom List (this will overwrite the entire Custom List).
- Select Copy One to copy a select workout to the Custom List. You will then need to select the Favorite workout to copy, and the Custom workout to replace.
After you complete a workout, the Performance Monitor saves it to the LogCard, if the LogCard is present; otherwise, the PM saves the workout to PM Memory. The PM stores the 10 most recent workouts done with that monitor.
To transfer a workout from the PM Memory to the LogCard:
- On the Main Menu, select More Options.
- Select LogCard.
- Select LogCard Utilities.
- Select Move Workout.
- From the list displayed, select the workout you would like to move.
- Select Move to LogCard.
- Insert the LogCard in the Performance Monitor.
- On the Main Menu, select More Options.
- Select LogCard.
- Select LogCard Utilities.
- Select Delete Workout.
- Select the workout to delete.
Deleting a workout removes it from the LogCard but does not free up space. To delete workouts and free up space on the LogCard, use the Concept2 Utility to remove workouts from your LogCard.
Each LogCard holds up to five users. If you are sharing your LogCard with other users, take the following steps to change to a different user.
Choose one of several methods:
- Remove the card and reinsert.
- From the Main Menu, press the MENU button 4 times to power off the monitor. Press the MENU button again to turn it on. You will then be prompted to select a user.
Some monitors have a “Switch User” menu option. Please note that this feature has been removed from current firmware so it may not be present on your monitor.
- Press Menu | Back until the Main Menu screen is displayed.
- Select More Options.
- Select Switch User.
- Select the desired user.
If you do not see the Switch User option, either your firmware does not support this option or you only have one user on your LogCard.
To view workout results on the LogCard:
- Insert a LogCard into the Performance Monitor.
- On the Welcome screen, select LogCard Menu.
- Select List by Date or List by Type, according to your preference. If you choose List by Type, then choose the workout type for which you want to view results (Single Distance, Single Time, and so on).
- Use the arrow selections to navigate to the workout results you want to view.
- Choose the magnifier icon to view the results.
You need to use the Concept2 Utility to completely erase your LogCard and start over. This procedure restores your LogCard to the way it was when it shipped from the factory. Take the following steps:
- Download and install the latest version of the Concept2 Utility.
- Connect the Performance Monitor or card reader to your computer.
- Insert your LogCard into the Performance Monitor or card reader.
- Under the Maintenance & Settings option on the Concept2 Utility, select Manage Stored Results.
- Select LogCard.
- Select Delete Results.
- Follow the Concept2 Utility prompts.
Games and Racing
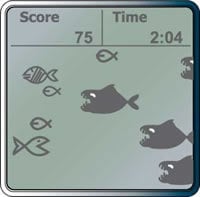
The Fish Game teaches you how to modulate intensity. The object of this game is to rack up as many points as possible by eating the nutritious fish while avoiding the large, toothy beasts that will send your score plummeting to the ocean floor.
On the PM screen, you're the fish facing the onslaught of fellow ocean-dwellers, both good and not-so-good. Alter your intensity to move your fish up and down the left-hand side of the screen. When an edible “good” fish comes your way, try and gobble it up to get points (small fish are worth 30 points; striped fish are worth 60 points). Avoid the large predators, as they’ll take 45 points off your score if they catch you.
Each game lasts four minutes, with a play again option at the end. Your Fish Game workout information (time, distance, pace per 500 meters, and so on) is saved to your LogCard or PM Memory, just like a regular workout.
To set up a Fish Game:
- (PM5 Only) From the Main Menu select More Options > Games > Fish Game.
- (PM4 Only) From the Main Menu, select Games > Fish Game.
If you have PM3s, your option for running a race is to run a wired race with a PC and using USB cables as the means of wiring (network/Ethernet cables will not work). This is also your option if you have a mix of PM3s, PM4s and PM5s.
Wired racing with a PC requires the use of a the Digital Rowing's RowPro software package to manage the race. RowPro enables venue racing with up to 16 boats per race in 3D on your PC. Boats can be single sculls, doubles, quads or octuples. RowPro also enables Online Rowing and Racing with one single scull per PC. For more information about racing with RowPro, visit digitalrowing.com.